Docker Captain Advice
Docker Deep Dive
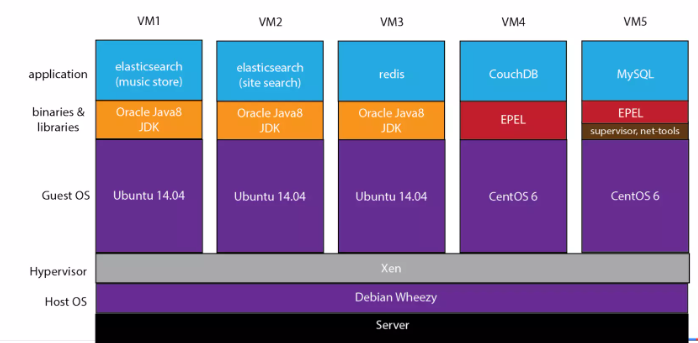
VM Workload
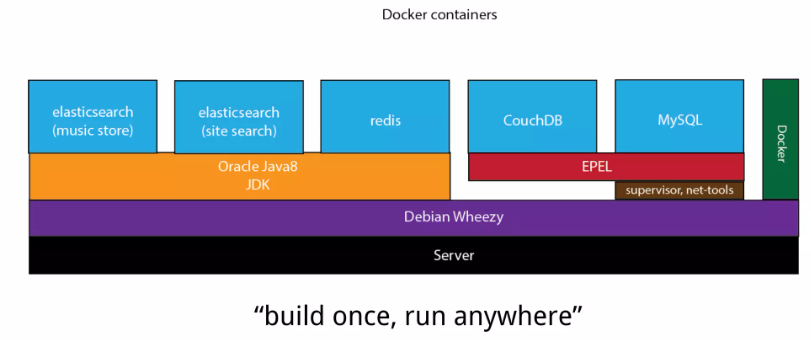
We need to isolate the app components from the host environment
Docker Workload
A practical set of notes covering Docker internals, Linux containers, runtimes, networking, storage, security, OCI, and interview concepts.
What is Docker?
Docker allows applications to run inside containers by using Linux kernel features to isolate and control processes.
Docker provides mechanisms to:
- Control and isolate system-resource usage of process groups
- Isolate processes
- Isolate the network stack
- Isolate filesystem mount points
- Isolate inter-process communication (IPC)
- Isolate hostname and domain name
- Isolate users and groups
| Linux Technology | Purpose |
|---|---|
| Namespaces | Resource isolation |
| Cgroups | Resource control, limits, and accounting |
| Union/Overlay Filesystems | Layered filesystem management |
Evolution of Linux Container Runtimes
The container ecosystem evolved through several important technologies|
- 2008 LXC contains combined version of
Linux namespaces+Linux control groups (cgroups)earlier docker default version - 2014 Libcontainer Written in Golang, to communicate directly with the Linux kernel.
- 2015 runC formed OCI standards. it became a lightweight, portable implementation for creating and running individual OCI containers
- 2016 Containerd extracted core container-management functionality. provides higher level container apis at low-level uses
runC
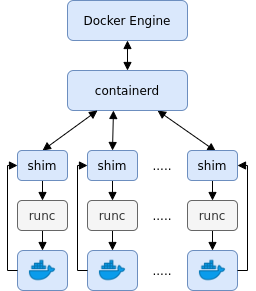
Low Level Container Runtime
A low-level runtime interacts closely with the Linux kernel.
- Create a container
- Configure namespaces
- Configure cgroups
- Configure mounts
- Configure capabilities/security settings
- Start the container process
- Destroy the container
High Level Runtime
manages the broader container lifecycle.
- Pulling images
- Managing image content
- Managing snapshots/storage
- Managing container lifecycle
- Networking integration
- Process supervision
flowchart LR
    A(Orchestrator) --> HLR

    subgraph HLR[High Level Runtime]
        B1[Pull Image]
        B3[Create OCI Configuration]
        B2[Prepare image filesystem]
        B4[...]
    end

    HLR --> LLR
    subgraph LLR[Low Level Runtime]
        C1[Configure namespace]
        C2[Configure cgroups]
        C3[Configure mounts/security]
        C4[...]
    end
    LLR --> D(Linux Kernel)
    D --> E(Container Process)
Main Characteristic of Docker
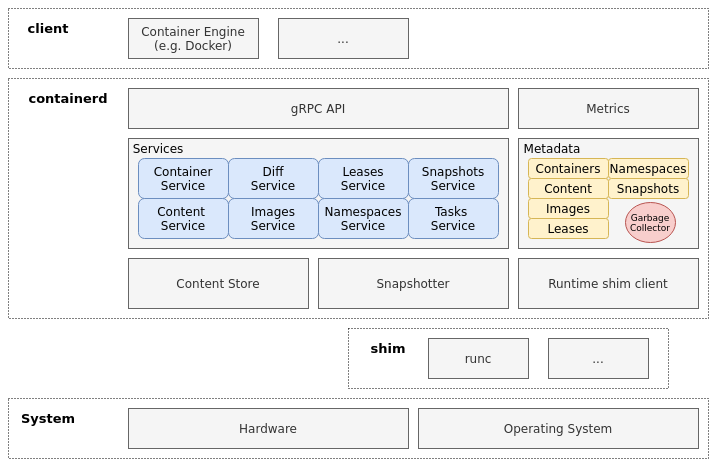
shim: A component that integrates running container processes with the higher-level runtime.
| Characteristic | Technology |
|---|---|
| Isolation | Linux namespaces |
| Resource control | Linux cgroups |
| Privilege restriction | Linux capabilities |
| System-call filtering | seccomp |
| Mandatory access control | AppArmor / SELinux |
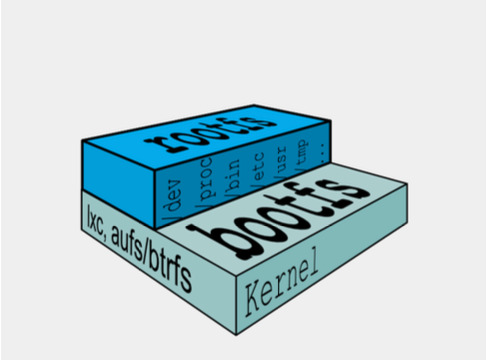
| Filesystem isolation | Mount namespaces + filesystem layers |
| Networking | Linux networking + Docker network drivers |
Namespace
Linux namespaces provide resource isolation. A container gets its own view of selected system resources while sharing the host kernel
lsns
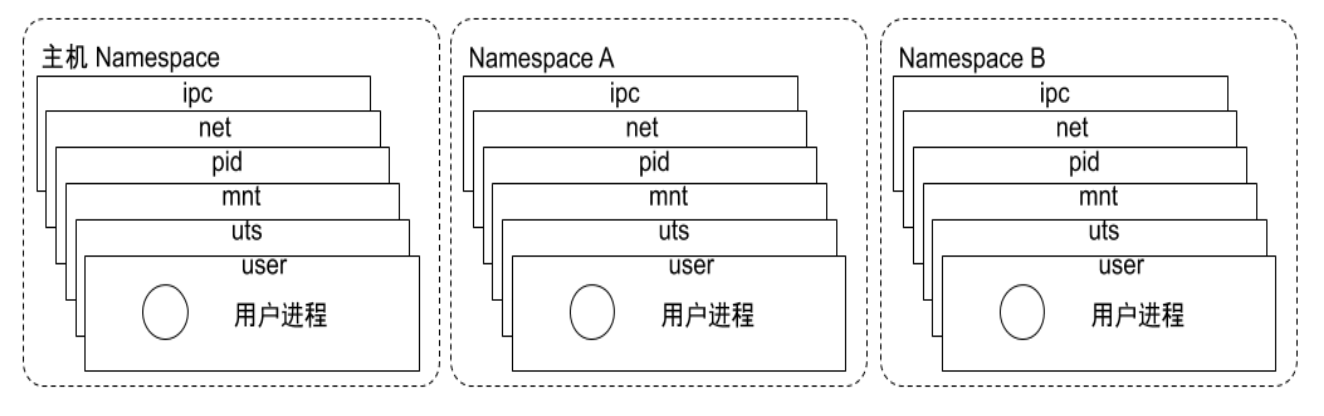
Pid Namespace
provide process isolation. This means processes in different namespaces can have the same PID.
| Without PID Namespace (Host View) | With PID Namespace (Container View) |
|---|---|
| <pre>Host ├── 2 nginx ├── 3 mysql └── 4 java</pre> |
<pre>Container A └── PID 1 → nginx Container B └── PID 1 → java</pre> |
Net Namespace
A container utilizing a network namespace receives its own private:
- Network interfaces: Dedicated virtual ethernet devices (e.g.,
eth0). - IP addresses: Unique local or private network configurations.
- Routing tables: Independent rules for directing outgoing traffic.
- Firewall rules: Separate
iptablesornftablesconnection tracking state. /proc/netview: An isolated view of system networking statistics and metrics.
| Without Network Namespace (Shared) | With Network Namespace (Isolated) |
|---|---|
| <pre>Host Stack ├── eth0 → 192.168.1.50 ├── App A (Binds to port 80) └── App B (Port conflict if on 80)</pre> |
<pre>Container A └── eth0 → 172.17.0.2 (Port 80) Container B └── eth0 → 172.17.0.3 (Port 80)</pre> |
IPC Namespace
IPC namespaces isolate System V Inter-Process Communication objects and POSIX message queues. Processes in one IPC namespace cannot directly access IPC objects belonging to another isolated IPC namespace.
- System V IPC: Isolated message queues, semaphore sets, and shared memory segments.
- POSIX Message Queues: Isolated network-like message passages between local processes.
| Without IPC Namespace (Shared) | With IPC Namespace (Isolated) |
|---|---|
| <pre>Host Memory / Queues ├── Msg Queue A (Accessible by all) ├── Shared Mem B (Accessible by all) └── Conflict if keys duplicate</pre> |
<pre>Container A └── Private Msg Queue A (Invisible to B) Container B └── Private Shared Mem B (Invisible to A)</pre> |
mnt Namespace
Allow different processes to view different file structures, so the file directories seen by each process in are isolated
uts Namespace
UTS() allows each to have its own and , allowing it to be regarded as a separate node on the network rather than a process on .
| Without UTS Namespace (Shared) | With UTS Namespace (Isolated) |
|---|---|
| <pre>Host System └── Hostname: web-server-01 ├── App A (Sees “web-server-01”) └── App B (Sees “web-server-01”)</pre> |
<pre>Container A └── Hostname: frontend-prod Container B └── Hostname: db-replica-01</pre> |
user Namespace
Each can have different and , meaning the program can be executed internally by internal users rather than users on .
Cgroups
Control Groups (cgroups) provide resource control, limits, and accounting for groups of processes
cgroups Resource quotas and measurement have been implemented
- blkio: This subsystem setting limits the input and output control of each block device. For example: disk, optical disc, and so on.
- CPU: This subsystem uses a scheduler to provide access to the task. (For example, in a process , multiple processes simultaneously claim one , which actually divides into multiple time slices and assigns them to different processes to execute.)
- cpuacct: Generate resource reports for tasks
- cpuset: If it is multi-core, this subsystem will allocate separate memory and memory for the task.
- devices: Allow or deny mission access to the device.
- freezer: Pause and resume tasks.
- memory: Set the memory limits for each and generate memory resource reports.
- net_cls: Label each network packet for easy use
- ns: Name space subsystem.
- pid: Process Identifier Subsystem
docker inspect <container_name_or_id> --format ''
stat -fc %T /sys/fs/cgroup

cat  /sys/fs/cgroup/cpu/cpu.shares
cat  /sys/fs/cgroup/cpu/cpu.cfs_period_us
cat /sys/fs/cgroup/cpu/cpu.cfs_quota_us
cat /sys/fs/cgroup/cpu/cpu.stat
cat /sys/fs/cgroup/memory.current
cat /sys/fs/cgroup/memory.max
cat /sys/fs/cgroup/memory.events
Linux CPU Scheduling
Linux uses scheduler mechanisms to determine which runnable tasks receive CPU time. CFS — Completely Fair Scheduler
Syscall filtering
by Seccomp
Control Previleged operation
capabilities: Limit what a user can do previleged operation
- mount,
- kill,
- chown,…
cap_addcap_drop
Filesystem
Union FS allows multiple directories/filesystem layers to appear as one filesystem. and behavior is commonly called Copy-on-Write (CoW).
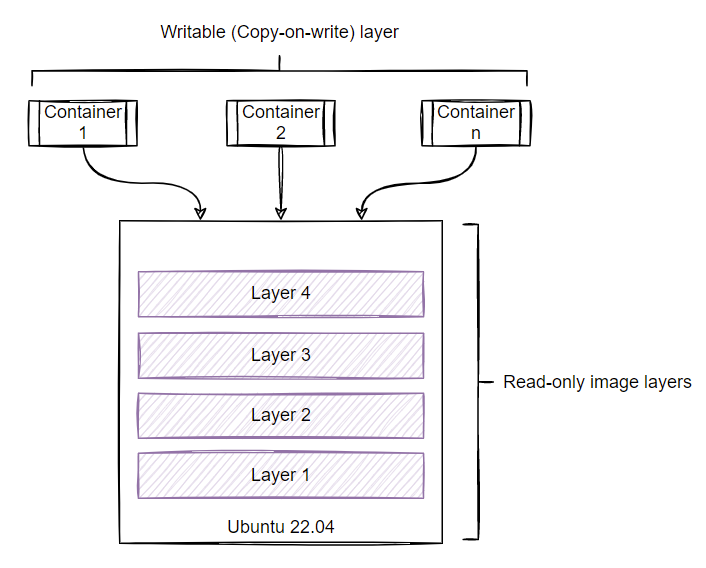
Even you deleted the particular file in the Writable layer, but it’s present in Readable layer docker uses whiteout simply hides it
FROM debian:slim
RUN apt install -y default-jre
RUN wget elasticsearch
RUN untar elasticsearch
COPY /app.jar /app.jar
ENTRYPOINT ["java","app.jar"]
| Step 1 | Step 2 | Step 3 | ||
|---|---|---|---|---|
 |
➡️ | 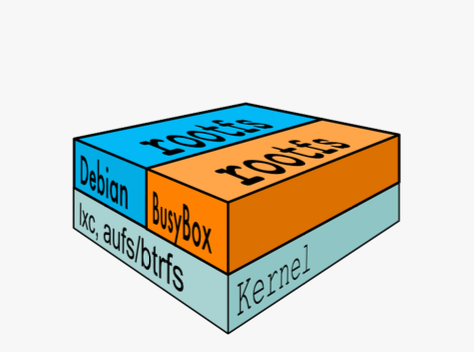 |
➡️ | 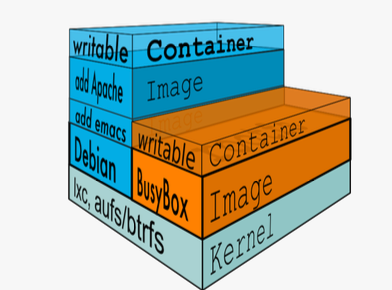 |
Docker now uses OverlayFS
                    Container
                        │
                        ↓
                  Merged View
                        │
              ┌─────────┴─────────┐
              ↓                   ↓
        Writable Layer        Image Layers
              │                   │
            R/W                 R/O
                                  │
                         ┌────────┼────────┐
                         ↓        ↓        ↓
                      Layer 3  Layer 2  Layer 1
mental model
                  Container
                      │
                      ↓
               Merged filesystem
                      │
             ┌────────┴────────┐
             ↓                 ↓
       Writable layer      Read-only layers
             │                 │
             │           ┌─────┴─────┐
             │           ↓           ↓
             │        Layer 2      Layer 1
             │
             ↓
        Copy-on-Write
             │
             ↓
       Modified files

       Deleted lower files
             │
             ↓
          Whiteout
OCI standards
- OCI Image Specification → Defines image format
- OCI Runtime Specification → Defines container runtime behavior/configuration
- OCI Distribution Specification → Defines distribution APIs/protocols
Docker Networks
- Bridge
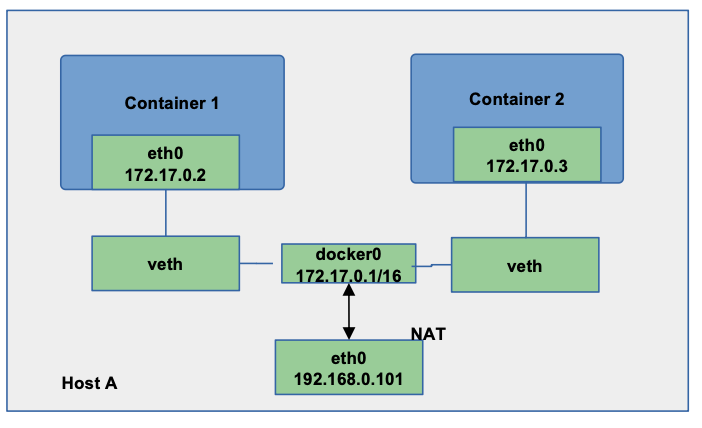
- None
- Host
Docker Engine
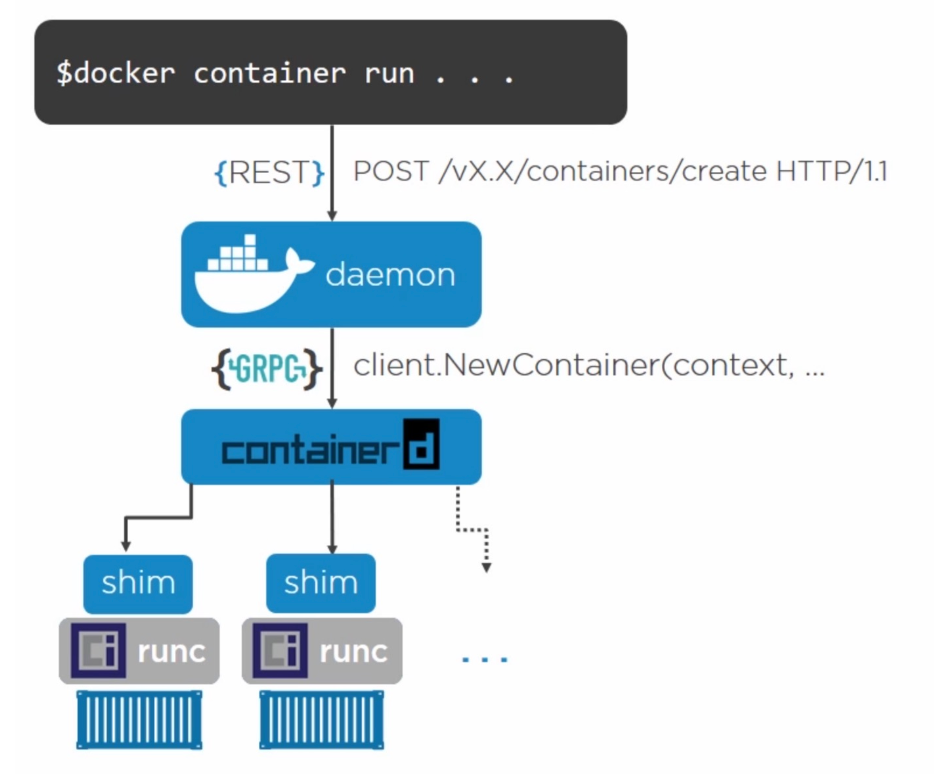
Docker commands
Build
# Standard image build using the current directory as context
docker build -t my-app:latest .

# Modern BuildKit build (default in modern Docker versions) with faster caching
DOCKER_BUILDKIT=1 docker build -t my-app:latest .
Specific file & .dockerignore & Logs
# Build using a custom named Dockerfile instead of the default 'Dockerfile'
docker build -f Dockerfile.dev -t my-app:dev .

# Build with raw logs streamed completely without terminal formatting or wrapping
docker build --progress=plain -t my-app:latest .

# Example of a `.dockerignore` file concept to skip node_modules and git metadata:
# Prevents large, unnecessary local files from bloating the build context.
# Contents of .dockerignore:
# .git
# node_modules/
# *.log
build by platform
# Build an image targeted for a specific platform architecture
docker build --platform linux/amd64 -t my-app:amd64 .

# Build for multiple target architectures simultaneously using Docker Buildx (requires a builder instance)
docker buildx create --name mybuilder --use
docker buildx build --platform linux/amd64,linux/arm64 -t username/my-app:v1.0 --push .
organize by tag labels
# Tag an existing image with a precise semantic version and a moving 'latest' alias
docker tag my-app:latest ://my-registry.com
docker tag my-app:latest ://my-registry.com

# Embed non-reusable structural metadata (labels) directly during the build phase
docker build --label "maintainer=devops@company.com" --label "build_version=v1.2.4" --label "environment=production" -t my-app:latest .
ARG vs ENV
- ARG (Build-time): Only available while the image is building. It is completely absent once the container starts running.
- ENV (Runtime): Available during the build AND persists inside the running container as an environment variable.
# Dockerfile snippet showcasing the differences:
# ARG VERSION=16
# FROM node:${VERSION}                  <- ARG used to pick base image
# ENV NODE_ENV=production               <- ENV set for the final container application

# Override a build-time argument from the command line interface
docker build --build-arg VERSION=18 -t my-node-app .

# 1. This WILL override the internal ENV (NODE_ENV will now be 'development' inside)
docker container run -d -e NODE_ENV=development my-node-app
ADD vs COPY
- COPY (Recommended): Explicitly copies local files or folders from the host machine context straight into the container.
- ADD: Copies files but includes advanced logic. It automatically extracts local tar archives into directories and downloads files directly from remote URLs
# Dockerfile snippet showcasing the behavior:
# COPY package.json /app/              <- Safest, default practice for standard assets
# ADD sourcecode.tar.gz /app/          <- Automatically extracts the tarball into /app/
# ADD https://example.com /   <- Downloads file directly into container root
ENTRYPOINT vs RUN
- RUN (Build-time): Executes commands inside a temporary layer to modify the file system (e.g., installing packages) during the build process.
- ENTRYPOINT (Runtime): Configures the concrete executable command that fires up by default the moment the container transitions to a running state.
# Dockerfile snippet showcasing the mechanics:
# RUN apt-get update && apt-get install -y curl  <- Executed during 'docker build'
# ENTRYPOINT ["curl", "-s"]                      <- Executed during 'docker run'

# Usage mapping at runtime:
# Passing an argument appends seamlessly to the ENTRYPOINT executable
docker run --rm my-curl-image https://github.com
INIT
Basically, primary application executable that fires up by default ENTRYPOINT the moment the container transitions to a running state. It defines the core purpose of the container.
INIT Injects a lightweight init system (like tini) into the container to run as PID 1, moving your ENTRYPOINT application to PID 2+.Containers running complex apps (like Node.js, Java, or multiple background processes) often fail to respond to docker stop or clean up dead child processes. The --init flag resolves this completely.
Without --init:  [PID 1: Your App]      <-- Frequently ignores SIGTERM / leaves zombie processes
With --init:     [PID 1: Tini Init] -> [PID 2: Your App]  <-- Properly reaps zombies & handles signals

# Force Docker to use an init process to safely reap zombie processes
docker container run -d --init --name safe-app my-node-image

# Stop the container instantly (Init forwards SIGTERM properly, avoiding the 10-second timeout)
docker container stop safe-app
MultiStage Build
# --- Stage 1: The Builder Environment ---
FROM golang:1.21 AS builder
WORKDIR /src
COPY . .
# Compile a single static binary file
RUN CGO_ENABLED=0 GOOS=linux go build -o myapp .

# --- Stage 2: The Production Runtime ---
FROM alpine:latest
RUN apk --no-cache add ca-certificates
WORKDIR /root/
# Securely extract only the compiled binary file from the previous stage
COPY --from=builder /src/myapp .
# Define final container initialization executable
ENTRYPOINT ["./myapp"]
# Build the multi-stage pipeline (Docker naturally discards Stage 1 bulk layers)
docker build -t production-app:latest .

# Stop the build execution early at a specific targeting layer for debugging
docker build --target builder -t debug-builder:latest .
Image
query by label
# Filter and list images matching a specific maintainer label
docker image ls --filter "label=maintainer=devops@company.com"

# Filter and list images containing a specific build stage metadata label
docker image ls --filter "label=stage=builder"

# Remove all images that have a specific deployment label applied
docker image rm $(docker image ls -q --filter "label=environment=staging")

# Custom output format showing IDs, creation timestamps, and repository tags for all images
docker images -a --format='  :'
Image layers & History
# View the linear build history and structural layers of an image
docker image history nginx

# View build history with full-length command descriptions instead of truncated text
docker image history --no-trunc nginx

# View only the specific text layer sizes of an image to find storage bottlenecks
docker image history --format ": " nginx
Inspect & Metadata
# Extract and view the complete raw metadata configuration JSON schema
docker image inspect nginx

# Extract specific structural details using Go template formatting syntax
docker image inspect -f '' nginx                 # View CPU architecture (amd64/arm64)
docker image inspect -f '' nginx                 # List default internal environment variables
docker image inspect -f '' nginx         -        # View default startup execution command


# Format standard image listing into a clean, customized data table showing tags and file sizes
docker images --format "table :\t"
docker image inspect nginx
Push & Pull registry
# Authenticate securely with a target image registry provider
docker login ://example.com -u your_username

# Tag an existing local image structure to match target registry paths
docker image tag nginx:latest ://example.com/production/nginx:v1.0

# Push the newly tagged local architecture up to the secure remote repository
docker image push ://example.com/production/nginx:v1.0

# Pull down an update package without launching a container runtime interface
docker image pull ://example.com/production/nginx:v1.0
Prune & Clean up
# Remove a specific targeted image variant completely from host disks
docker image rm nginx:latest

# Remove all dangling images (images that are untagged and not used by any container)
docker image prune

# Deep clean: remove ALL images not currently associated with an active running container
docker image prune -a

# Automatically clean up images based on age conditions (e.g., older than 48 hours)
docker image prune -a --filter "until=48h"
Container
Lifecycle & States
docker container run nginx -d # detached; run in background
docker container run --name webserver nginx   # with custom-name
docker container ls -a
docker ps -a

docker container stop webserver         # stop the container
docker container start  webserver       # start the container
docker container stats webserver        # statistics
docker container inspect webserver      # inspect

docker container rm  webserver          # only stopped container can be removed
docker container rm CONTAINER_NAME --force  # May the Force be with you
- from tar file
docker save dog_breeds > dog_breeds.tar
docker load --input dog_breeds.tar
Port mapping & Publish
docker container run -d --name nginx nginx  # create nginx container
docker container run -d --name my-app alpine/curl  # curl container

# test the container from curl -> nginx
docker container exec -it my-app sh
curl <IP-OF-NGINX-CONTAINER>:80       # docker inspect -f '' nginx

# remove the nginx container and publish new container with published port
docker container rm nginx --force
docker container run -d --name nginx -p 8080:80 nginx
     -p   8080     :        80
            │                │
    ┌───────┴──────┐ ┌───────┴──────────┐
    │  Host Port   │ │  Container Port  │
    │ (Your Laptop)│ │ (Inside Nginx)  │
    └──────────────┘ └──────────────────┘
Logs & Monitoring
docker container logs nginx             # view all logs
docker container logs -f nginx          # follow/stream logs in real-time
docker container logs --tail 10 nginx   # view only the last 10 lines
docker container top nginx              # list running processes inside container
docker container stats nginx            # live stream of CPU, memory, and network usage

docker logs --tail 1000 -f --timestamps container_id
docker logs --tail 1000 -f --details container_id
docker logs --tail 1000 -f --since UTC container_id
docker logs --tail 1000 -f --until 60 container_id

# --tail
# -f continue straming new output from the container
# --details extra information
# --since since when utc/min
Environment variables
# pass a single environment variable
docker container run -d --name my-db -e MYSQL_ROOT_PASSWORD=secret mysql

# pass multiple variables using an env file
echo "DB_USER=admin\nDB_PASS=password" > .env
docker container run -d --name app --env-file .env alpine
Exec & Interactive terminal
docker container exec nginx ls -l
docker container exec -it nginx bash
Restart policies
docker container run -d --restart no nginx             # default; do not restart
docker container run -d --restart on-failure nginx    # restart only if container exits with error
docker container run -d --restart always nginx        # always restart, even if stopped manually
docker container run -d --restart unless-stopped nginx # restart unless explicitly stopped by user
Capabilities & Privileges
# grant full root privileges to the host system (use with caution)
docker container run -d --privileged --name secure-app nginx

# add specific Linux kernel capabilities (e.g., allow system clock modifications)
docker container run -d --cap-add=SYS_TIME --name time-app alpine

# drop specific Linux kernel capabilities for hardened security
docker container run -d --cap-drop=CHOWN --name hardened-app alpine
Resource limits (CPU & Memory)
# limit maximum memory allocation to 512 Megabytes
docker container run -d --memory="512m" nginx

# limit maximum CPU usage to 1.5 cores
docker container run -d --cpus="1.5" nginx

# set memory limit along with swap memory allocation
docker container run -d --memory="512m" --memory-swap="1g" nginx
Healthchecks & Init processes
# configure internal healthcheck intervals and rules
docker container run -d  --name health-web  --health-cmd="curl -f http://localhost/ || exit 1"   --health-interval=5s   --health-timeout=3s   --health-retries=3 nginx

# run with pid 1 init process to forward signals and reap zombie processes
docker container run -d --init --name init-app alpine
Volume
Named volumes
Managed entirely by Docker, isolated from host machine file structures, and persistent across container lifecycles
docker volume create my-data            # create a named volume explicitly
docker volume ls                        # list all available volumes
docker volume inspect my-data           # view storage location on host system

# mount the named volume to the container target directory
docker container run -d --name web -v my-data:/usr/share/nginx/html nginx
     -p   my-data   :     /usr/share/nginx/html
            │                │
    ┌───────┴──────┐ ┌───────┴──────────┐
    │      Host    │ │  Container       │
    │ (Your Laptop)│ │ (Inside Nginx)   │
    └──────────────┘ └──────────────────┘
Bind mounts
Maps an exact, absolute path on your host machine directly to a path inside the running container.
# mount local development directory to nginx server using modern --mount flag
docker container run -d --name dev-web \
  --mount type=bind,source="$(pwd)"/html,target=/usr/share/nginx/html \
  nginx

# short syntax alternate version using absolute path variable
docker container run -d --name dev-web-alt -v "$(pwd)"/html:/usr/share/nginx/html nginx
Anonymous volumes
Created dynamically without an explicit name when a container is run; automatically deleted if the container is removed with the -v flag
# generate a dynamic hash-named volume for temporary, high-performance storage
docker container run -d --name temp-app -v /data alpine

# cleanup container and its associated anonymous volumes at the same time
docker container rm -v temp-app
Volume drivers
Allows Docker to bypass local storage and mount external storage systems like AWS S3, Azure Files, DigitalOcean block storage, or SSH/NFS shares directly
# install a cloud storage volume driver (example using local NFS share setup)
docker volume create --driver local --opt type=nfs --opt o=addr=192.168.1.50,rw --opt device=: /path/to/nfs/share  nfs-volume
# 1. Install the official managed Rclone volume plugin
docker plugin install rclone/docker-volume-plugin:latest --grant-all-permissions

# 2. Create the volume passing S3 parameters via driver options (--opt)
docker volume create --driver rclone/docker-volume-plugin --opt type=s3 --opt s3-provider=AWS --opt s3-access-key-id=YOUR_ACCESS_KEY --opt s3-secret-access-key=YOUR_SECRET_KEY --opt s3-region=us-east-1 --opt vfs-cache-mode=full s3-volume:your-bucket-name
Backup & Restore
Uses a temporary intermediary container to archive or extract volumes back onto your system
# Backup: archive 'my-data' contents into a compressed tar file on the host machine
docker container run --rm -v my-data:/volume -v "$(pwd)":/backup alpine tar cvf /backup/backup.tar /volume

# Restore: extract the backup tar file contents back into a new volume
docker container run --rm -v new-data:/volume -v "$(pwd)":/backup alpine tar xvf /backup/backup.tar -C /volume --strip-components=1
Secrets
Build-time secrets
Compose secrets
Vault integration
Network
Bridge network
Host network
Overlay network
Custom networks
DNS & Service discovery
Installation
Local
# docker
## stackoverflow
sudo systemctl status docker
sudo usermod -a -G docker $(whoami)
sudo apt install -y ca-certificates curl gnupg lsb-release
sudo mkdir -p /etc/apt/keyrings
curl -fsSL https://download.docker.com/linux/ubuntu/gpg | sudo gpg --dearmor -o /etc/apt/keyrings/docker.gpg
echo "deb [arch=$(dpkg --print-architecture) signed-by=/etc/apt/keyrings/docker.gpg] https://download.docker.com/linux/ubuntu $(lsb_release -cs) stable" | sudo tee /etc/apt/sources.list.d/docker.list > /dev/null  #  echo "$(dpkg --print-architecture)" amd64
docker version --format ''
EC2
# login
chmod 400 path_to_pem_file.pem
ssh -i path_to_pem_file.pem ubuntu@IPv4Address
sudo apt update -y

# installation
sudo apt install docker.io
docker --version
sudo usermod -aG docker $USER   # add $USER to docker group
sudo chmod 666 /var/run/docker.sock   # trying to connect Docker daemon socket @ unix:///var/run/docker.sock
Checkup
docker version
docker info
docker info --format ''

ls -l /run | grep -Ei docker
srw-rw----  1 root              docker    0 Jun 21 14:02 docker.sock
s:: socker
# stop service
service docker stop

# listen docker to remote rather than local machine
docker -H IP_ADDRESS:2375 -d & # standard port for non-ssl DOCKER
netstat tlp   # to verify PID showing or not

# make docker client to talk to docker deamon
export DOCKER_HOST="tcp://IP_ADDRESS:2375"
settings in Docker Desktop to see intermediate container
{
	"features":{
		"buildkit": false         // true
	}
}
# once the intermediate container id
docker comit container_id container_name
docker run --rm -it container_id bash+
FROM pytorch/pytorch:latest
RUN pip3 install --upgrade pip && pip install jupyterlab
CMD ["jupyter","lab","--ip=0.0.0.0","--port=9999","--NotebookApp.token=''","--NotebookApp.password=''","--allow-root"]